Installing a small name plate is one thing. Mounting farmhouse entrance signs is something completely different. A ceramic and stone name plates can weigh anywhere from 5kg to over 30kg. At that weight, the wrong fixing method can crack a brick pillar, split a stone face, or pull completely free from the wall after the first year outdoors.
Getting this right requires understanding your surface, choosing the correct anchor system, and following the installation steps in the right order. Skip any step and you risk a sign that sags, tilts, or falls.
This guide covers everything you need to know. It works for brick pillars, natural stone gate posts, and metal house plates. By the end, you will know exactly which fixing system to use for your specific entrance type and how to install it safely.
📥 Download Free: Print our Heavy Gate Sign Installation Checklist PDF and follow it on site during your installation.
What Makes a Gate Sign “Heavy” and Why Does the Installation Method Change?
For the purpose of this guide, a heavy gate sign is any sign that weighs more than 5kg or that has a panel area greater than 0.3 square metres. Below these thresholds, standard adhesive tape and light screws can carry the load safely for door name plates. Above them, you need structural fixings.
The weight threshold matters because of physics. A sign hanging on a wall is not just a dead weight pulling straight down. It also creates a rotational force (called a bending moment or overturning moment) that tries to pull the top of the sign away from the wall while pushing the bottom of the sign into it. This bending moment grows rapidly with sign weight and panel area.
Also, outdoor signs face additional dynamic loads. Wind pressure acts directly against the face of the sign panel. For a 1 square metre panel in a 40 m/s wind storm, the wind force on the sign is approximately 960 Newtons (roughly 100kg equivalent force). This load acts horizontally against the fixing system.
This means that the fixing system for a heavy gate sign must resist three different forces simultaneously: the downward weight of the sign, the outward pull of the bending moment, and the horizontal push of wind pressure. Standard adhesive tape and light screws are not designed to resist all three of these forces at the required safety factors.
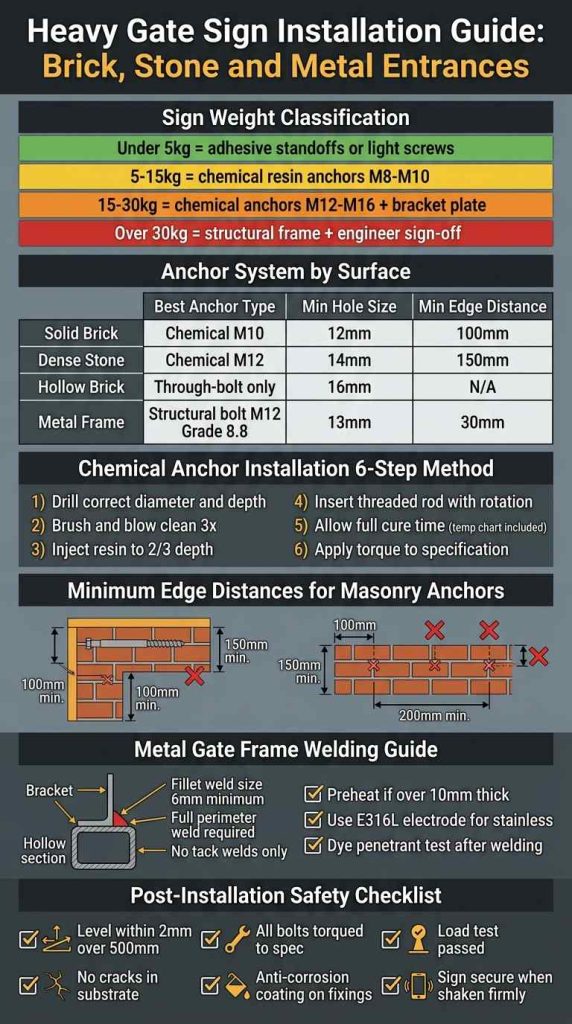
The weight-based system for choosing the right method:
| Sign Weight | Fixing System Required | Minimum Number of Fixings |
| Under 5kg | VHB adhesive tape or 4mm screws with 6mm plugs | 4 fixing points minimum |
| 5 to 15kg | M8 or M10 chemical resin anchors with bracket | 4 fixing points minimum |
| 15 to 30kg | M12 or M16 chemical anchors with steel bracket plate | 6 to 8 fixing points |
| Over 30kg | Structural frame with engineer sign-off required | Consult structural engineer |
Expert Note: When assessing the structural integrity of a 3-year-old brick gate pillar before specifying heavy gate sign fixing positions, to determine whether the brick and mortar are sound enough to accept M12 chemical resin anchors rated at 15kN tension load per anchor, an acoustic impact (tap) test using a 250g calibrated ball impact hammer with attached piezoelectric accelerometer, USB data acquisition at 100kHz sampling rate, and spectral frequency analysis software displaying the impact response frequency spectrum is used to scan the brick pillar face in a 100mm grid pattern. Sound, well-bonded brick and mortar generates a sharp, high-frequency impact response above 2,000Hz. Hollow, delaminated, or weak areas produce a dull, low-frequency response below 800Hz. All low-frequency zones are mapped and excluded from anchor placement. Acoustic impact testing for structural assessment of masonry follows the method described in ASTM D4580-12 (Standard Practice for Measuring Delaminations in Concrete Bridge Decks by Sounding), adapted here for masonry gate pillar structural assessment.
What Tools and Equipment Do You Need to Mount a Heavy Gate Sign?
Heavy gate sign installation requires more tools than a lightweight name plate. Having every tool on site before you start prevents delays and ensures the work is done correctly in one visit.
Core drilling and fixing tools:
- Rotary hammer drill (SDS-plus for holes up to 16mm, SDS-max for larger diameter holes)
- Correct diameter carbide masonry or diamond core drill bits
- Battery-operated drill for driving screws and light fixings
- Chemical anchor injection gun (cartridge-type for resin anchors)
- High-torque wrench for final bolt tightening
Safety and assessment tools:
- Non-contact voltage detector (before drilling near any electrical supply)
- Personal protective equipment: safety glasses, hard hat, gloves, dust mask (P2 rated for silica dust when drilling masonry)
- Heavy-duty work gloves for handling large stone or metal sign panels
- Lifting straps or suction cup lifters for positioning panels weighing over 10kg
Alignment and measurement tools:
- Steel tape measure and steel rule
- 600mm spirit level or laser line level
- Pencil and chalk line for marking fixing positions
- Digital torque wrench for final bolt torque verification
Fixing materials:
- Correct chemical anchor cartridges with mixing nozzles
- Grade 316 stainless steel threaded rods (not mild steel, which will rust)
- Grade 316 stainless steel nuts, washers, and bracket plates
- Neutral-cure silicone sealant for sealing around fixings after installation
Lifting and handling equipment:
- Sign lifting frame with chain blocks or ratchet straps for heavy panels
- Adjustable sign support stands (to hold the panel in position while fixings are secured)
- A second person (essential for any sign over 10kg)
Expert Note: When verifying that all four M12 stainless steel structural bolts securing a 22kg granite gate sign panel to its wall-mounted bracket plate are tightened to the specified installation torque of 60 Newton-metres, a pneumatic impact wrench with 1/2-inch square drive, 1,000 Nm maximum torque, electronic torque multiplier mode at 5:1 ratio, and integrated digital angle monitor displaying degrees of rotation after snug is used to apply the correct torque to each M12 Grade 316 stainless bolt at the bracket-to-pillar interface. The torque is applied in two stages: 30 Nm initial snug-up, then 60 Nm final torque with angle confirmation. A bolt that reaches 60 Nm with less than 30 degrees of rotation indicates it has been correctly engaged. A bolt still rotating past 120 degrees at 60 Nm indicates possible cross-threading or hole oversize. Pneumatic impact tool torque output and angle monitoring follows the performance test method in ISO 5393:2020 (Rotary Tools for Threaded Fasteners: Performance Test Method).
How Do You Choose the Right Anchor System for a Heavy Sign on a Brick or Stone Gate?
The most important decision in heavy gate sign installation is the anchor system. The wrong anchor on the wrong substrate can fail quietly and without warning over 1 to 3 years, eventually dropping the sign entirely.
There are three main anchor categories for heavy gate signs.
Chemical resin anchors (best for masonry and stone) Chemical anchors consist of a two-part resin injected into a pre-drilled hole, followed by a stainless steel threaded rod inserted into the wet resin. As the resin cures, it bonds chemically to both the rod and the surrounding masonry. This creates a full-length bond along the entire hole depth. Chemical anchors are the recommended system for heavy gate signs on brick and natural stone because they distribute the load along the full bond length rather than at a single expansion point.
Chemical anchors are also tolerant of damp conditions. Most standard chemical anchor resins can be used in holes that are moist (but not water-filled). This makes them ideal for brick and stone pillars in wet climates.
Mechanical expansion anchors (for solid concrete or dense engineering brick only) Mechanical anchors work by expanding a sleeve or wedge inside the drilled hole when the bolt is tightened. The expansion creates a clamping grip against the hole walls. These anchors are very strong in dense, crack-free concrete and engineering brick, but they create outward radial pressure that can split softer stone or handmade brick, especially near edges.
Use mechanical anchors only in solid concrete or very dense engineering brick. Never use them in soft brick, sandstone, limestone, or any stone that shows any sign of cracking.
Through-bolts (for hollow pillars or where access to both sides is possible) If the gate pillar is hollow (a brick skin over an air cavity, or a hollow concrete block pillar), the only reliable heavy-load fixing method is a through-bolt that passes completely through the pillar. A stainless steel rod, threaded at both ends, passes through a core-drilled hole and is secured with large washers and nuts on each face of the pillar. The load is distributed across the full pillar section.
Through-bolts require access to both faces of the pillar. They are not suitable for solid stone pillars where drilling all the way through would damage the visual appearance of the far face.
| Substrate Type | Best Anchor | Minimum Diameter | Minimum Embedment Depth | Edge Distance |
| Solid fired brick | Chemical M10 | 12mm hole | 100mm | 100mm from any edge |
| Engineering brick or dense block | Chemical M12 or mechanical | 14mm hole | 130mm | 120mm from any edge |
| Natural sandstone or limestone | Chemical M12 (slow cure) | 14mm hole | 140mm | 150mm from any edge |
| Granite | Chemical M12 | 14mm hole | 130mm | 150mm from any edge |
| Hollow brick or block pillar | Through-bolt M12 | 16mm hole | Full pillar thickness | N/A |
| Steel hollow section gate frame | Structural bolt M12 Grade 8.8 | 13mm clearance hole | Full thickness of steel | 30mm minimum |
Expert Note: When specifying chemical resin anchors to mount a 28kg carved sandstone gate sign panel on an outdoor stone gate pillar in a location where the air temperature regularly falls below 0 degrees Celsius in winter and peaks at 45 degrees Celsius in summer, to determine whether the resin bond will maintain sufficient strength under this extreme thermal cycling over a 25-year service life, a sustained load (bond creep) test at elevated temperature is conducted on the proposed resin system. The test subjects five M12 threaded rods set in 140mm deep holes in sandstone test blocks with the proposed resin to a sustained tension load of 60 percent of the characteristic ultimate bond resistance (typically 12 to 15 kN for M12 in sandstone) for 1,000 hours at 50 degrees Celsius ambient temperature. At 50°C, the resin experiences approximately the same thermal creep as it would accumulate from 25 years of seasonal thermal cycling at the installation site. Resin systems that show rod displacement below 0.5mm after 1,000 hours at 50°C pass the sustained load requirement. Chemical anchor sustained load testing follows the methodology described in ETAG 001 Annex C:2010 (European Technical Approval Guide for Anchors for Use in Concrete: Sustained Load Tests), the definitive European standard for long-term anchor performance verification.
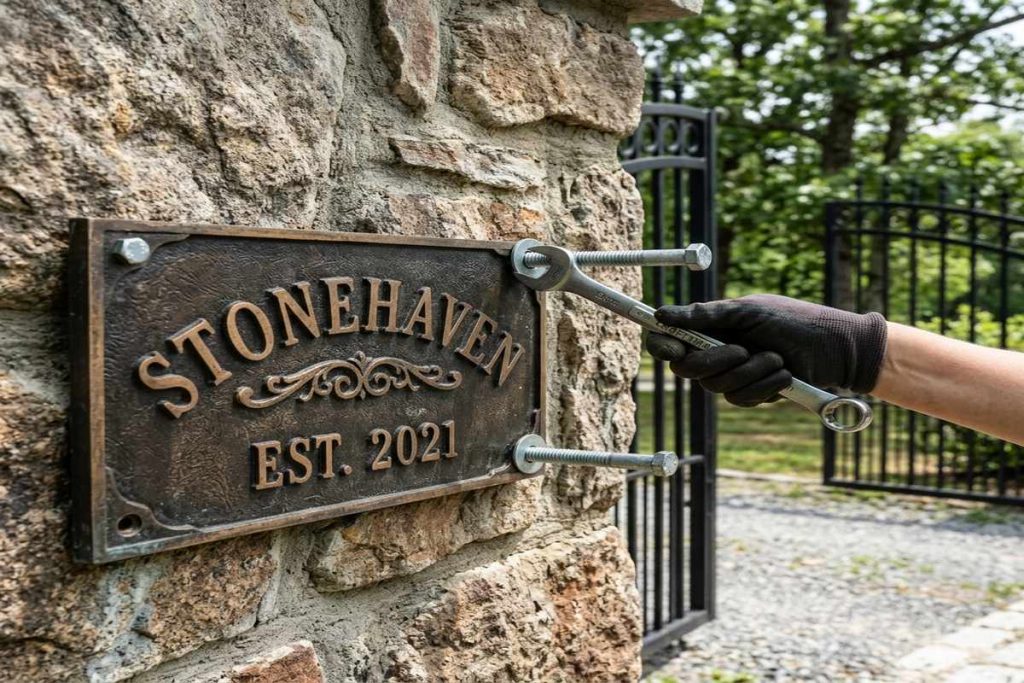
How Do You Install a Heavy Gate Sign on a Solid Brick Pillar Step by Step?
Brick pillars are the most common gate structure in the UK, India, and Australia. Standard fired-clay brick with cement mortar is strong enough for chemical resin anchors, but the installation must follow a precise sequence to get reliable results.
Step 1: Verify the pillar is solid brick, not hollow or veneer. Tap the surface firmly with your knuckle at multiple points. A solid brick pillar gives a consistent dense knock. A hollow centre gives a dull, echoing sound. If the pillar sounds hollow, use through-bolts as described in the hollow pillar section. Also, check the mortar joints. Use a sharp tool to probe the mortar slightly. Sound mortar is hard and resistant. Soft or crumbly mortar indicates weathered or low-quality mortar that will not support chemical anchors reliably.
Step 2: Mark the fixing positions. Position the sign panel (using support stands or a second person) at the correct height. Mark the two (or four) fixing position centres directly from the sign’s fixing holes onto the pillar face. Remove the sign.
Also, mark the minimum edge distances on the pillar face. No fixing should be closer than 100mm to the face edge or corner of the pillar. Also, keep fixings at least 200mm from the top of the pillar. Draw these exclusion zones on the pillar with chalk before confirming that your fixing positions fall outside them.
Step 3: Drill the anchor holes. Use a carbide masonry bit in hammer mode on an SDS-plus drill. Drill perpendicular (straight in) to the pillar face. Maintain a constant drilling angle throughout. For M10 anchors, drill a 12mm diameter hole to 110mm depth. For M12 anchors, drill a 14mm hole to 130mm depth.
After drilling, brush the hole thoroughly with a wire brush 3 times. Then blow the dust out with compressed air (or a blow-out pump) 3 times. Do this alternately: brush, blow, brush, blow, brush, blow. Dust left in the hole reduces chemical anchor bond strength by up to 50 percent. This cleaning step is the most critical part of chemical anchor installation.
Step 4: Inject the resin anchor. Fit the mixing nozzle to the resin cartridge and waste the first 2 strokes of resin into a container until the mixed resin appears a consistent uniform colour with no streaks. This ensures the two components are fully mixing. Then inject resin from the bottom of the hole upward, filling the hole to approximately two-thirds of the embedment depth. Insert the stainless steel threaded rod with a slow, twisting rotation to ensure the resin fills all voids around the rod. Position the rod at the correct projection (the length that will stick out of the pillar to accept the sign bracket).
Step 5: Allow full cure time before loading. Do not apply any load to the anchor until the resin has fully cured. At 20 degrees Celsius, most chemical anchor resins need a minimum of 24 hours before full load application. At 10 degrees Celsius, this extends to 48 to 72 hours. At temperatures below 5 degrees Celsius, most standard resins stop curing and must not be used.
Check the resin manufacturer’s data sheet for the exact cure time at your site temperature. Mark each anchor rod with a warning tag so nobody loads the sign prematurely.
Step 6: Fit the bracket plate and attach the sign. Fit the steel bracket plate (or direct sign fixings) over the projecting threaded rods. Apply stainless steel washers under each nut. Tighten all nuts to the specified installation torque with a calibrated torque wrench. Finally, seal around the base of each threaded rod with neutral-cure silicone sealant to prevent water ingress into the anchor hole.
Expert Note: When checking the concrete or masonry gate pillar for active rebar corrosion before drilling anchor holes, to avoid drilling into a rebar that may already be in an advanced state of corrosion and could fracture during drilling impact, a half-cell potential measurement kit with copper/copper sulphate reference electrode, calibrated high-impedance digital voltmeter with 0.1mV resolution, and grid measurement template is used to measure the electrochemical potential of the embedded rebar cage through the pillar surface at 100mm measurement grid spacing. A potential reading more negative than minus 350mV (vs copper/copper sulphate) indicates a greater than 90 percent probability of active rebar corrosion at that grid location. Drilling near actively corroding rebar risks puncturing the protective concrete cover and accelerating the corrosion process. Active corrosion zones are avoided during anchor placement. Half-cell potential measurement of reinforced concrete structures follows ASTM C876-15 (Standard Test Method for Corrosion Potentials of Uncoated Reinforcing Steel in Concrete).
How Do You Install a Heavy Gate Sign on a Natural Stone Gate Post?
Natural stone gate posts (granite, sandstone, limestone, dressed stone, or rubble stone) require more care than brick because stone is more brittle near the surface and cannot absorb the radial expansion pressure of mechanical anchors safely.
Key differences from brick installation:
First, always use slow-cure chemical anchor resin when drilling into natural stone. Standard fast-cure resins generate significant heat as they cure. In dense stone such as granite, this heat has nowhere to dissipate and can cause thermal stress cracking around the anchor hole. Slow-cure resins generate much less heat and bond more reliably in stone.
Next, increase the minimum edge distances compared to brick. For natural stone, the minimum distance from any anchor to a face edge or stone joint should be 150mm. Stone is more likely than brick to crack radially from a fixing point if the edge distance is insufficient.
Also, drill at a slower speed in natural stone than in brick. Granite particularly can fracture if drilled at high speed with excessive pressure. Use a sharp carbide bit, set the drill to medium speed (not full hammer mode), and apply only light forward pressure. Let the carbide tip do the work. If the drill stalls or the bit overheats, stop and allow the stone and bit to cool before continuing.
For rubble stone or irregular coursed stone walls (where the surface is uneven), do not try to fix the sign directly to the irregular surface. Instead, install a hidden steel sub-frame in the stone (a flat steel angle or channel fixed with chemical anchors at the most solid stone faces). Attach the sign panel to this flat sub-frame. The sub-frame provides a flat, level fixing plane regardless of the stone irregularity.
Drilling into stone joints versus through the stone: In brick walls, drilling in the mortar joint is preferred. In natural stone gate pillars, the opposite is true. Drill through the solid stone body wherever possible. Mortar joints in stone pillars are typically weak, old lime mortar that does not provide reliable anchor resistance. Use the solid stone face itself as the anchor substrate.
Expert Note: When drilling large diameter core holes (80mm to 100mm) through a granite gate post for hidden through-bolt installation to mount a 35kg carved sandstone gate sign panel, a diamond core drill rig with 80mm internal diameter dry-cut diamond core bit, adjustable vacuum base plate with 25kN suction holding force, 1,500-watt drive motor with speed control from 300 to 900 RPM, and integrated water-cooling port is used to drill the full-thickness core hole through the granite pillar at the correct angle and depth. Diamond core drilling at controlled low speed (typically 400 to 500 RPM for 80mm diameter in granite) produces a clean, accurately dimensioned hole without the radial stress cracking that rotary hammer drilling at the same diameter would cause. The diamond core extracts a solid stone core that can be examined for internal voids, crack planes, or rebar positions that may affect the through-bolt installation. Diamond core drilling of concrete and masonry follows the hole geometry and dimensional tolerance procedure in ASTM C42/C42M-20 (Standard Test Method for Obtaining and Testing Drilled Cores and Sawed Beams of Concrete), adapted here for granite stone gate pillar core drilling.
How Do You Mount a Heavy Sign onto a Metal Gate Frame or Steel Posts?
Metal gate frames (hollow square section steel, wrought iron, aluminium box section, or cast iron posts) require a completely different installation approach from masonry. Metal does not accept chemical anchors. Instead, you connect the sign to the metal structure by bolting, welding, or clamping.
Method 1: Through-bolting (for hollow metal sections) For hollow square or rectangular steel gate posts and frames, drill a clearance hole through both walls of the hollow section. Pass an M12 Grade 316 stainless steel bolt through the sign bracket, through both walls of the steel section, and secure with a large washer and nut on the far side. The bolt in double shear (passing through both walls) is extremely strong.
Also, insert a short piece of the same diameter steel tube (called a crush tube or sleeve) inside the hollow section between the two bolt holes before tightening. Without this sleeve, the hollow section will deform (crush) as the bolt is tightened. The sleeve prevents this by carrying the compressive clamping load.
Method 2: Welding a mounting plate to the gate frame For a permanent, very high-strength connection, a steel mounting bracket plate (8 to 10mm thick, Grade 316 stainless or hot-dip galvanised mild steel) is welded directly to the gate post or frame. The sign brackets are then bolted to this plate. This is the strongest and most permanent fixing method for metal gates.
The weld must be a full-perimeter fillet weld, minimum 6mm throat size, on both sides of the bracket plate. Tack welds alone are not acceptable for a heavy load-bearing sign connection. After welding, allow the metal to cool completely, then test the weld by dye penetrant inspection.
Method 3: U-bolt clamping (for cylindrical or round section posts) For wrought iron round section posts or round tube gate pillars, U-bolt clamp assemblies in Grade 316 stainless steel wrap around the post and the sign bracket sits between the two legs of the U-bolt. This method requires no drilling or welding and can be removed later without permanent damage to the gate post.
| Metal Gate Type | Best Mounting Method | Special Requirement |
| Hollow square steel section (SHS) | Through-bolt with crush tube | Insert crush tube before tightening |
| Hollow rectangular steel (RHS) | Through-bolt with crush tube | Two bolts minimum for sign over 8kg |
| Solid steel or cast iron post | Welded bracket plate | Full perimeter fillet weld minimum 6mm |
| Round tube gate pillar | U-bolt clamp system | Use neoprene liner to protect post finish |
| Aluminium box section gate | Through-bolt + aluminium backup plate | Avoid steel-aluminium direct contact (use isolating washer) |
Expert Note: When inspecting the fillet welds connecting a 10mm thick Grade 316 stainless steel mounting bracket plate to a round section stainless steel gate post, before the 24kg gate sign panel is attached to the bracket, to confirm there are no surface or near-surface cracks in the welds that could lead to brittle fracture under the combined static and dynamic wind loading, a Type I (visible light) liquid penetrant inspection system consisting of water-washable fluorescent penetrant, emulsifier, and developer in aerosol cans, with 365nm UV inspection lamp and 10-lux maximum white light background is used to inspect the full weld length on the bracket plate perimeter weld. Penetrant is applied and allowed to dwell for 10 minutes. After washing and drying, developer is applied. Under UV light inspection, any surface crack in the weld shows as a bright fluorescent indication. Any linear indication longer than 5mm requires weld repair before sign attachment. Liquid penetrant inspection of stainless steel welds follows ASTM E165/E165M-12 (Standard Practice for Liquid Penetrant Examination for General Industry), applicable to all metal alloy weld inspection in structural applications.
How Do You Use Chemical Resin Anchors for Maximum Load Capacity?
Chemical resin anchors are the most reliable fixing system for heavy gate signs on masonry. But they only perform to their rated capacity if they are installed correctly. There are five critical factors that determine the actual bond strength of a chemical anchor.
Factor 1: Hole cleanliness (the most important factor) A dirty hole is the number one cause of chemical anchor failure below the rated load. Even a thin film of masonry dust over the hole walls prevents the resin from bonding chemically to the substrate. The bond strength in a dirty hole can be as low as 20 percent of the rated value.
Clean the hole at least 3 times with a wire brush and 3 times with compressed air before injecting any resin. If the site is dusty, clean 5 times with each method.
Factor 2: Hole diameter matching the anchor specification Each anchor size has a specified hole diameter. A hole that is 2mm oversized has significantly less contact area between the resin and the hole wall. This reduces the bond capacity by up to 30 percent. Always use the correct drill bit diameter as specified on the anchor datasheet.
Factor 3: Embedment depth Deeper holes give more bond length and higher load capacity. The minimum embedment depth is specified for each anchor size and substrate combination. Increasing depth beyond the minimum provides additional safety margin. Never cut corners on depth.
Factor 4: Temperature during installation and curing Resin curing is a chemical reaction that slows dramatically in cold weather. At temperatures below 5 degrees Celsius, most standard resins do not cure at all. At 10 degrees Celsius, the cure time may be 3 to 5 times longer than at 20 degrees Celsius. Always check the anchor datasheet for the minimum installation temperature and extended cure time at low temperatures.
Factor 5: Edge and spacing distances Anchors placed too close to the edge of the pillar or too close to each other interact with each other’s failure cones and reduce each other’s capacity. Always observe the minimum edge and spacing distances stated in the anchor European Technical Assessment (ETA) or ICC-ES approval document.
Expert Note: When verifying that the chemical resin anchor cartridge injection gun is delivering a correctly mixed resin at a consistent 1:1 or 2:1 volume ratio (depending on the cartridge specification) before the first anchor hole is filled on a critical heavy gate sign installation, a dual-component resin anchor cartridge injection pump with integrated flow rate monitoring, pressure gauge from 0 to 40 bar, side-by-side piston position display showing A and B component stroke ratio, and low-flow alarm at less than 80% rated output is used to verify the volumetric mixing ratio of both components through the installed mixing nozzle by injecting 50ml of mixed resin into a graduated container and measuring the A:B component contributions separately in a split-flow verification test before injection into any anchor hole. An off-ratio mix by more than 5 percent produces insufficient crosslinking in the cured resin and reduces bond strength by 30 to 60 percent. On-ratio verification follows the injection equipment qualification procedure in ICC-ES AC308:2021 (Acceptance Criteria for Post-Installed Adhesive Anchors in Concrete Elements), the US acceptance criterion for chemical anchor installation equipment performance.
How Do You Align and Level a Heavy Gate Sign Perfectly Before Final Fixing?
Heavy gate signs require proper pre-positioning before any holes are drilled. A sign that is installed even 3mm out of level on a 1,200mm wide panel is clearly visible to anyone approaching the gate.
The two-stage positioning method:
Stage 1 is the dry positioning (no resin in place yet). Hold the sign panel in position using adjustable support stands or a second person with lifting straps. Also, use a spirit level on the top and side edges of the sign panel simultaneously. Mark the fixing hole positions on the pillar through the sign panel’s pre-drilled fixing holes. This is the only accurate way to transfer the hole positions to the pillar: the sign tells you exactly where the holes need to be.
Remove the sign. Check the marked hole positions with a steel tape for correct spacing. Then measure the vertical positions of the two (or four) fixing marks. For a level installation, the left and right fixing holes on the same horizontal row must be at exactly the same height from the ground. If they are not, recheck your spirit level or laser level and reposition.
Stage 2 is the final fit check (resin anchors already set, threaded rods projecting from the pillar). Before sliding the sign panel over the projecting rods, check that the distance between rod centres exactly matches the distance between fixing holes in the sign panel. Even a 1mm difference in rod spacing means the sign will not fit over the rods.
If there is a small (up to 2mm) mismatch, use slotted fixing holes (elongated oval holes instead of round holes) in the sign bracket to allow adjustment. If the mismatch is larger, grind the existing rod out and redrill in the correct position.
Expert Note: When verifying the three-dimensional position of four M12 projecting threaded rods that have been set in a granite gate pillar for mounting a large and heavy carved sandstone gate sign panel, to confirm that all four rod centres match the panel fixing hole pattern within a tolerance of plus or minus 0.5mm before the panel (weighing 28kg) is lifted and slid over the rods, a portable 7-axis coordinate measuring arm (CMM arm) with carbon fibre links, 1.8-metre measuring range, 0.05mm volumetric accuracy, and touch probe with 6mm ruby ball tip is used to measure the 3D coordinate position of each rod centre from a single datum point on the pillar base. The measured coordinates are compared to the CAD drawing of the panel fixing hole pattern. Rods that are out of tolerance by more than 0.5mm cannot be corrected by hole elongation and must be removed and reset. Portable CMM arm accuracy classification follows ISO 10360-12:2016 (Geometrical Product Specifications: Acceptance and Reverification Tests for Coordinate Measuring Systems: Articulated Arm Coordinate Measuring Machine).
How Do You Connect Electrical Cables for a Wired LED Heavy Gate Sign?
Many heavy estate gate signs include integrated LED backlighting, halo lighting, or LED channel letters. These require a properly routed and protected electrical connection between the sign panel and the mains power supply.
Planning the cable route: Before drilling any holes for anchor fixings, plan the exact cable entry point through the gate pillar. Identify where the cable will enter the back of the sign panel, how it will pass through or behind the pillar, and where it will connect to the buried armoured supply cable.
The best cable entry for a gate pillar is through the side face of the pillar (not the front face where the sign sits), entering at the back of the sign panel position. This hides the cable completely behind the sign.
Cable type for outdoor gate pillar use: Use steel wire armoured (SWA) cable from the mains connection point to the junction box at the gate pillar. SWA cable is designed for direct burial and provides mechanical protection against accidental damage. From the junction box to the sign terminal block, use 1.5mm2 HO7RN-F flexible rubber cable rated for outdoor use. This cable is flexible enough to accommodate slight sign movement and is UV and oil resistant.
Sealing the cable entry: After routing the cable through the pillar, seal the cable entry point with waterproof cable gland compression fittings. A cable gland that correctly matches the cable outer diameter provides an IP68 seal (waterproof to 1 metre depth) and prevents water from tracking along the outside of the cable into the pillar cavity.
Connecting to the sign panel: Terminate all cable connections in an IP65 weatherproof terminal block inside the sign housing. Never use un-housed wire connectors or domestic-grade terminal blocks in an outdoor sign. The terminal connections should be accessible for maintenance without removing the sign from the wall.
Expert Note: When inspecting the anti-corrosion epoxy coating on the embedded steel mounting bracket that is cast into the concrete-filled gate pillar core before the gate pillar brickwork is laid around it, to confirm the coating has no pinholes or discontinuities that would allow moisture to reach the bare steel and initiate corrosion in the embedded zone over the sign’s intended 30-year service life, a high-voltage holiday (spark) detector with variable voltage control from 0.5kV to 35kV, audible and visual alarm, spring-ring electrode matching the bracket profile, and pulse-output sensitivity at 50 microamperes threshold current is used to test the entire surface area of the coated steel mounting bracket at a test voltage appropriate for the coating thickness (typically 1.0kV per 25 micrometres of dry film thickness, per ASTM D5162 Schedule A). Any pinhole in the coating passes the test current and triggers the alarm. Pinholes are marked, ground out to bare metal, spot-primed with zinc-rich primer, and recoated with epoxy before the bracket is installed. Coating continuity testing (holiday testing) follows ASTM D5162-08 (Standard Practice for Discontinuity (Holiday) Testing of Nonconductive Protective Coating on Metallic Substrates).
How Do You Protect the Fixing Hardware From Rust After Installation?
Hardware corrosion is the most common cause of premature gate sign failure. Even when the sign panel itself is in perfect condition, corroded fixings allow the sign to loosen, shift, and eventually fall.
Choose the right hardware material from the start: For any outdoor gate sign installation, use Grade 316 stainless steel for all nuts, bolts, washers, threaded rods, and bracket plates. Grade 316 is the only stainless steel grade that reliably resists chloride pitting in coastal environments. Grade 304 stainless is acceptable for inland sites but should be avoided within 5km of the coast.
Hot-dip galvanised mild steel is acceptable for embedded elements (inside concrete foundations or behind rendered surfaces) where the steel will be protected from direct weather exposure. However, hot-dip galvanised fixings that are exposed to the weather will show rust staining within 10 to 15 years in most climates.
Seal every fixing point after installation: After all bolts are tightened and brackets are secured, apply a bead of neutral-cure silicone sealant around every fixing point. Silicone sealant prevents water from pooling in the gap between the sign bracket and the pillar face. Water pooling at this interface is the most aggressive corrosion zone because water is trapped and cannot dry out between the surfaces.
Apply corrosion inhibitor paste to bolt threads: On all exposed bolt threads (the visible section of the rod projecting from the pillar), apply a thin coat of clear corrosion inhibitor paste (such as Lanolin-based Lanotec or Metalguard) to the thread after final tightening. This displaces moisture from the thread pitch and dramatically slows rust formation on any exposed thread.
Annual maintenance inspection: Check all fixing points once a year. Look for: orange rust staining on the pillar face below the sign, loosening of any bolts (try to turn each bolt head by hand to check it has not worked loose), and cracking in the silicone sealant around each fixing. Replace cracked sealant immediately. If any bolt has loosened, investigate the cause before retightening.
Expert Note: When verifying the shear bond strength of the structural adhesive used to attach a flat-backed 8kg stone mosaic gate sign panel to a flat granite pillar face without using mechanical fixings, to confirm the adhesive bond can carry the combined peel, shear, and tensile loads from the installed sign weight plus wind pressure with a 3.0 safety factor, a lap shear bond strength test using a calibrated tensile testing machine with 10kN load cell, bonded single-lap specimen (25mm wide, 12.5mm bond overlap) of the proposed stone-to-stone bond assembly cured for the specified time at 23 degrees Celsius, and a 1.3mm/min loading rate is used to measure the lap shear strength in Newton per square millimetre of the structural adhesive on the proposed stone substrate. A lap shear strength above 2.0 N/mm2 confirms the adhesive meets the structural requirement for this application with a 3.0 safety factor over the calculated shear stress from the sign weight and wind load combination. Lap shear adhesive bond testing follows ASTM D1002-10 (Standard Test Method for Apparent Shear Strength of Single-Lap-Joint Adhesively Bonded Metal Specimens by Tension Loading), adapted here for stone-to-stone bonded joint qualification.
What Are the Structural and Safety Checks You Must Do After Installation?
Once the sign is installed and all fixings are torqued, carry out these six post-installation checks before handing over the installation.
Check 1: Level verification Place a 600mm spirit level on the top edge of the sign. The bubble should be centred within the level’s acceptance zone. For a sign 1,200mm wide, the maximum acceptable out-of-level reading is 2mm end to end. More than this is visible to the eye and must be corrected before commissioning.
Check 2: Bolt torque verification Using a calibrated torque wrench, apply the specified installation torque to every bolt. If any bolt continues to turn past the specified torque, the anchor is not fully developed and must be investigated. Remove the sign, inspect the anchor hole and resin, and redrill or use a chemical injection system to recover the anchor.
Check 3: Substrate crack inspection Examine the pillar face within 200mm of every fixing point carefully for any new cracks that developed during installation. Even fine hairline cracks indicate that the anchor hole edge distance was too small or the drill bit wandered during installation. Small cracks (less than 0.3mm wide) can be sealed with epoxy crack injection. Cracks wider than 0.5mm require a structural engineer assessment before loading.
Check 4: Sign stability shake test Stand directly in front of the sign and grasp the sign panel with both hands. Apply a firm lateral push, vertical push, and outward pull. The sign should feel completely solid with no movement, no creak, and no change in position. Any perceptible movement indicates a loose fixing that must be investigated and corrected before commissioning.
Check 5: Sealing completeness Check that all fixing points, cable entry points, and joints between the sign panel and the pillar face are sealed with silicone sealant. Look specifically for any unsealed gap at the top edge of the sign where rainwater can run behind the panel.
Check 6: Electrical test for LED signs For LED gate signs, switch on the lighting and verify: all LED zones illuminate correctly, no buzzing or flickering occurs, the light intensity is even across the sign face, and the IP-rated junction box shows no condensation or moisture entry.
Expert Note: When measuring the actual bending stress in a stainless steel cantilever bracket arm supporting a 20kg gate sign panel in a cantilevered configuration (sign face 300mm from the pillar face), under simulated maximum design wind load to confirm the bracket stress does not exceed 60 percent of the material yield strength (providing a 1.67 safety factor), a strain gauge rosette (0-45-90 degree orientation, nominal resistance 120 ohms, gauge factor 2.10) bonded to the maximum stress location on the bracket arm with cyanoacrylate adhesive, connected to a 4-channel digital strain gauge data acquisition unit with 0.001 microstrain resolution and USB output is used to measure the principal strains and calculated principal stresses in the bracket arm under the applied test load. The test load equivalent to the design wind pressure (1.5kN applied horizontally at the sign centroid) is applied using a calibrated mechanical loading rig. Strain above 2,400 microstrain at any rosette element indicates the bracket stress has exceeded the yield threshold. Strain gauge bonding and data acquisition follows ASTM E251-92 (Standard Test Methods for Performance Characteristics and Calibration of Physical Strain Gauges).
What Are the Most Common Heavy Gate Sign Installation Mistakes and How to Avoid Them?
Mistake 1: Not cleaning the anchor holes This causes anchor failure below the rated load. Fix: brush and blow every hole at least 3 times each before injecting resin.
Mistake 2: Insufficient edge distance Anchors placed too close to the edge or corner of a pillar cause the stone or brick to crack. Fix: observe the minimum edge distance for every anchor (100 to 150mm depending on substrate) without exception.
Mistake 3: Using mechanical expansion anchors in soft or irregular stone Expansion anchors in soft stone (sandstone, limestone, handmade brick) create radial cracking. Fix: only use chemical resin anchors in any natural stone or soft brick.
Mistake 4: Loading anchors before full cure Applying the sign weight before the resin has fully cured displaces the anchor rod and dramatically reduces final bond strength. Fix: read the manufacturer’s cure time for your site temperature. Mark anchor rods with warning tags to prevent premature loading.
Mistake 5: Using zinc-plated hardware outdoors Zinc-plated (bright zinc or yellow chromate) screws and nuts rust within 2 to 5 years outdoors. Fix: use only Grade 316 stainless steel for all hardware on any outdoor gate sign installation.
Mistake 6: Not sealing cable entry points on LED signs Unsealed cable entries allow water to track along the cable into the sign housing, causing LED strip corrosion, short circuits, and housing moisture damage. Fix: always use IP68-rated cable gland fittings at every cable entry point.
Mistake 7: No crush tube inside hollow metal sections Tightening a bolt through a hollow metal section without a crush tube deforms the walls of the section and means the bolt torque cannot be reached. Fix: cut a short section of solid rod or tube to fit inside the hollow section at every through-bolt position before tightening.
Expert Note: When investigating why a chloride-contaminated brick gate pillar is producing inconsistent chemical anchor pull-out results (some anchors achieving only 60 percent of rated capacity despite following the correct installation procedure) to determine whether salt contamination from road de-icing operations has weakened the brick surface zone and is preventing full resin-to-substrate bonding at the anchor hole walls, a rapid chloride field test kit using silver nitrate indicator spray solution (0.1M AgNO3 in deionised water) with colour comparison chart (white background = below 0.05% Cl by mass of cement, pale cream = 0.05 to 0.10%, light brown = 0.10 to 0.20%, dark brown = above 0.20%) is used to test powdered brick samples collected from the drill bit tailings at each anchor position. Chloride above 0.10 percent by mass in the surface brick zone reduces chemical adhesion of polyester and vinylester resins significantly and requires the use of an epoxy-resin anchor system, which is less sensitive to chloride contamination. Field chloride testing of concrete and masonry follows ASTM C1152/C1152M-20 (Standard Test Method for Acid-Soluble Chloride in Mortar and Concrete), adapted here for rapid field assessment of brick drill debris.
How Do You Remove or Reposition a Heavy Gate Sign Without Damaging the Structure?
Removing a heavy gate sign that has been properly installed with chemical resin anchors requires cutting the anchor rods flush with the pillar face. Chemical resin anchors are designed for permanent installation and cannot be unscrewed or reversed.
Removing a chemically anchored gate sign: First, remove all nuts, washers, and the sign bracket from the projecting threaded rods. Then use an angle grinder with a thin cutting disc to cut each threaded rod flush with the pillar face. Alternatively, use an oscillating multi-tool with a metal-cutting blade for cuts in confined spaces.
After cutting, the stub of the rod embedded in the resin remains in the hole. The hole can then be filled with matching stone filler, cement mortar, or colour-matched epoxy filler to restore the pillar face appearance.
If you want to reposition the sign to a slightly different position on the same pillar, you will need to drill new anchor holes at least 200mm from the old hole positions. Old filled holes are never as strong as the surrounding undisturbed material and should not be used as anchor locations.
Removing a through-bolted sign from a hollow metal post: Unscrew the nuts on both sides of the post. Remove the bolts. The hollow section is left undamaged. Stainless steel cap screws or stainless steel socket head cap screws can be used to plug the holes if their appearance is a concern.
Removing a welded bracket from a gate frame: A welded connection requires grinding the weld off with an angle grinder. After grinding, the gate frame surface will need cleaning, grinding smooth, and repainting or recoating at the weld location.
Expert Note: When confirming that the concrete gate pillar has sufficient surface integrity at the proposed anchor positions to accept M12 chemical resin anchors at the design load, before drilling any holes, by checking for elevated chloride and sulfate content in the surface zone that might indicate aggressive chemical attack has already degraded the concrete matrix, a direct tension indicator (DTI) washer system consisting of hardened steel washers with pre-formed circular protrusions that flatten to a measurable extent when the bolt is at the specified proof load, verified with a 1mm feeler gauge and digital measurement of protrusion height with 0.01mm resolution is used to perform a proof load test of three M12 test anchors installed in the concrete pillar at the perimeter of the proposed anchor zone. The three test anchors are tensioned using a calibrated hollow-ram hydraulic jack until the DTI protrusion gap reduces to 0.4mm (indicating the bolt has reached 70 percent of proof load). All three test anchors passing this proof test confirms the concrete pillar can develop the required chemical anchor bond capacity. DTI washer tension verification follows ASTM F959/F959M-14 (Standard Specification for Compressible-Washer-Type Direct Tension Indicators for Use with Structural Fasteners).
🛍️ Shop Heavy Sign Mounting Systems: Browse our Grade 316 Stainless Steel Chemical Anchor Kits, Heavy Sign Bracket Plates, Through-Bolt Assembly Kits, and our Heavy Gate Sign Installation Service. All bracket systems are load-tested to EN 13411 before shipping.
Frequently Asked Questions About Heavy Gate Sign Installation
What is the maximum weight I can hang on a brick gate pillar with screws?
Standard 6mm nylon screw anchors in solid brick have a safe working load of 30 to 50kg each in direct tension. However, for a gate sign in an outdoor exposed position subject to wind load, the effective design load is much higher than the sign weight alone. For any sign over 5kg, use M10 or M12 chemical resin anchors rather than standard screw anchors. Chemical anchors rated at 15 to 25kN each provide the safety margin needed for combined wind and static loads on a heavy gate sign.
Can I use construction adhesive instead of chemical anchors for a heavy gate sign?
No. Construction adhesive (such as silicone, grab adhesive, or polyurethane sealant) is not suitable for structural sign fixing over 2 to 3kg. These products are gap-filling sealants, not structural adhesives. They have very low shear and peel strength under sustained outdoor conditions. Only use structural epoxy adhesives (such as Araldite AW106 or Sikadur 31) if you are using an adhesive-only fixing method, and only for signs under 10kg in sheltered positions.
How many anchor points do I need for a 20kg stone gate sign?
For a 20kg sign in a fully exposed outdoor position, use at least 4 anchor points with M12 chemical resin anchors. This provides a total rated load capacity of 4 x 15kN = 60kN (with appropriate safety factors applied), which is more than sufficient for the combined static and wind loads from a 20kg sign in normal residential wind conditions. For very large panels (over 0.6 square metres) or coastal high-wind locations, increase to 6 anchor points.
Can I install a heavy gate sign on my own or do I need a professional?
Signs under 15kg on a sound brick or concrete pillar can be installed by a competent DIY installer with the right tools. However, signs over 15kg, any sign on natural stone (especially near edges), any welded metal connection, and any sign requiring electrical connection to mains power should be installed by a professional sign installer or structural engineer. The consequences of a heavy gate sign falling are severe: personal injury, property damage, and potential legal liability.
What is the minimum cure time for chemical anchors before I can attach the sign?
At 20 degrees Celsius (standard room temperature), most general-purpose chemical anchor resins cure to full working load capacity in 24 hours. At 10 degrees Celsius, extend this to 48 to 72 hours. At 5 degrees Celsius, use only resin systems specifically rated for low-temperature installation. Never load a chemical anchor in less than the manufacturer’s stated minimum cure time for your site temperature. Marking each anchor rod with a dated warning tag prevents accidental premature loading.
How do I drill into natural stone without cracking it?
Use a sharp carbide masonry bit or a diamond-tipped bit (preferred for granite). Set the drill to medium speed, not maximum. Apply only light forward pressure. Let the bit do the cutting work. Stop every 30 seconds of drilling to allow the stone and bit to cool. For holes over 50mm diameter, use a water-cooled diamond core drill rig rather than a rotary hammer drill. Always observe the minimum edge distance (150mm for natural stone) to prevent radial cracking from the hole toward the stone face or edge.
What should I do if the anchor hole is in the wrong position?
If you have drilled in the wrong position but have not yet injected resin, fill the hole with fast-setting cement grout and allow to cure for at least 48 hours before drilling the correct position. If the wrong hole already has cured resin in it, grind the projecting rod flush and fill the hole with epoxy filler. Then drill the correct position at least 200mm from the repaired hole.
Can I weld stainless steel brackets to a mild steel gate frame?
Yes, but the weld process requires care. When welding austenitic stainless steel (Grade 316) to mild steel, use an E309 or E309L filler electrode. This transition-grade electrode is designed for dissimilar metal welding. After welding, protect the mild steel side of the joint from rust (the stainless steel side does not need treatment). Also, avoid grinding spatter or weld scale from the mild steel back onto the stainless steel surface as this can initiate corrosion.
How do I stop rust streaks from my gate sign fixings staining the pillar?
Use only Grade 316 stainless steel for all exposed hardware. Seal every fixing point with neutral-cure silicone sealant to prevent water from pooling in the bracket-to-pillar interface. Once a year, clean the fixing area and renew any cracked sealant. If rust staining has already occurred from previous zinc-plated hardware, remove the stain with oxalic acid-based rust remover on the masonry surface. Then replace all the hardware with Grade 316 stainless before the staining can recur.
What is the difference between chemical anchors and mechanical expansion anchors?
Chemical anchors (resin anchors) bond to the substrate by chemical adhesion along the full length of the drilled hole. They create no outward expansion pressure on the surrounding material. This makes them ideal for natural stone, soft brick, and near-edge installations. Mechanical expansion anchors (wedge anchors, sleeve anchors) work by physical expansion inside the hole when the bolt is tightened. This expansion creates radial outward pressure that can crack brittle or soft materials near edges. Mechanical anchors are only suitable for solid, crack-free concrete or very dense engineering brick, well away from any edge or corner.
Explore Essential House Name Plate Guides & Tutorials
Browse our comprehensive handcrafted signage guides for material care, font selection, and architectural placement:
- Beach & Airbnb Signage Design & Weatherproofing Guide (2026)
- Complete Guide to Wood House Sign Sealing & Weather Maintenance
- Horizontal vs Vertical House Numbers Layout Comparison
- Hanging & Wall-Mounted Cottage Sign Installation Guide
- Round vs Rectangular Name Plaques for Modern Property Entrances
- Best Modern & Vintage Fonts for Cottage & Residential Signs