A gate sign that looks good in daylight is only doing half its job. At night, without the right lighting, even the most beautiful carved granite sign becomes invisible. Visitors miss the entrance. Delivery drivers park in the wrong place. Emergency services take longer to find the property.
An illuminated entrance sign solves all of these problems at once. It makes the sign readable 24 hours a day, communicates quality and confidence to anyone approaching the property, and adds genuine curb appeal in the evening hours when the lighting effect is at its most dramatic.
But there is more to illuminating an estate sign than simply putting a floodlight near it. The light source type, colour temperature, beam angle, IP rating, power source, and control system all affect how good the final result looks and how long it lasts. Choose poorly and you end up with a glaring, buzzing, yellowing light that does more harm than good.
This guide walks through every decision in the right order. By the end, you will know exactly what type of illumination to choose, how to power it, and how to make it last for 15 to 20 years without replacement.
📥 Download Free: Print our Illuminated Sign Lighting Specification Sheet PDF and use it when briefing your sign maker or electrician.
Why Does an Illuminated Entrance Sign Make Such a Big Difference?
An unlit entrance sign relies entirely on ambient light from the street or the moon. In practice, this means the sign is unreadable from a moving vehicle at night on any driveway that is set back from the road by more than 20 metres.
An illuminated house sign is visible from much further away and in all weather conditions. The light draws the eye to the sign position before the visitor is close enough to read the text. This means they identify the entrance location much earlier, giving them time to slow down and turn safely.
There is also a security effect. A well-lit entrance, perhaps featuring elegant main door name plates, gives the impression that the property is actively occupied and maintained. Properties with dark, unlit entrances are statistically more likely to be approached without authorisation.
Also, there is the aesthetic impact. A high-quality illuminated estate sign lit with warm LED uplighters becomes a striking visual feature after dark. The light grazes across carved stone letters, creating deep shadow contrast that makes the text look three-dimensional. This effect is completely absent in daylight. Many estate owners say their illuminated sign looks more impressive at night than during the day.
There are three questions you need to answer before choosing a lighting system: What type of illumination fits the sign design? What power source is right for the location? And what controls do you want on the lighting?
Expert Note: When evaluating the suitability of a new 3000K warm white LED uplighter for illuminating an estate entrance sign in a rural location where stargazing is important to the property owner and where the local authority enforces the IDA Model Lighting Ordinance (MLO), to confirm the uplighter does not contribute measurable upward light spill to the night sky, a sky quality meter (SQM) with wide-angle detector accepting 20-degree half-angle cone, 7-digit mag/arcsec2 display resolution, and temperature compensation from minus 20 to plus 50 degrees Celsius is used to measure the naked sky brightness (magnitudes per square arcsecond) directly above the estate entrance sign position before and after the uplighter is switched on at full output. A sky brightness reduction below 0.1 magnitudes per arcsec2 between the baseline (off) and test (on) measurements confirms the uplighter contributes negligible upward light spill. A reduction greater than 0.3 magnitudes indicates significant sky glow from the fixture and requires the use of a full-cutoff shielded replacement. Sky quality measurement follows the instrument performance standard referenced in the International Dark-Sky Association (IDA) SQM Measurement Protocol, Third Edition, the globally recognised standard for dark sky brightness verification.
What Types of Illuminated Entrance Signs Are Available?
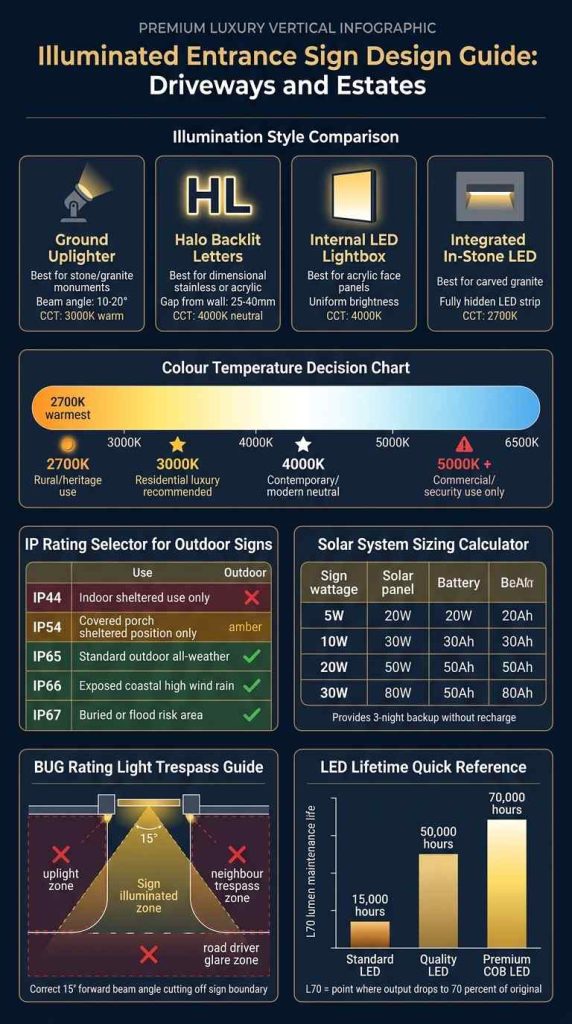
The illumination method determines the visual effect, the installation complexity, and the long-term running cost. There are four main types.
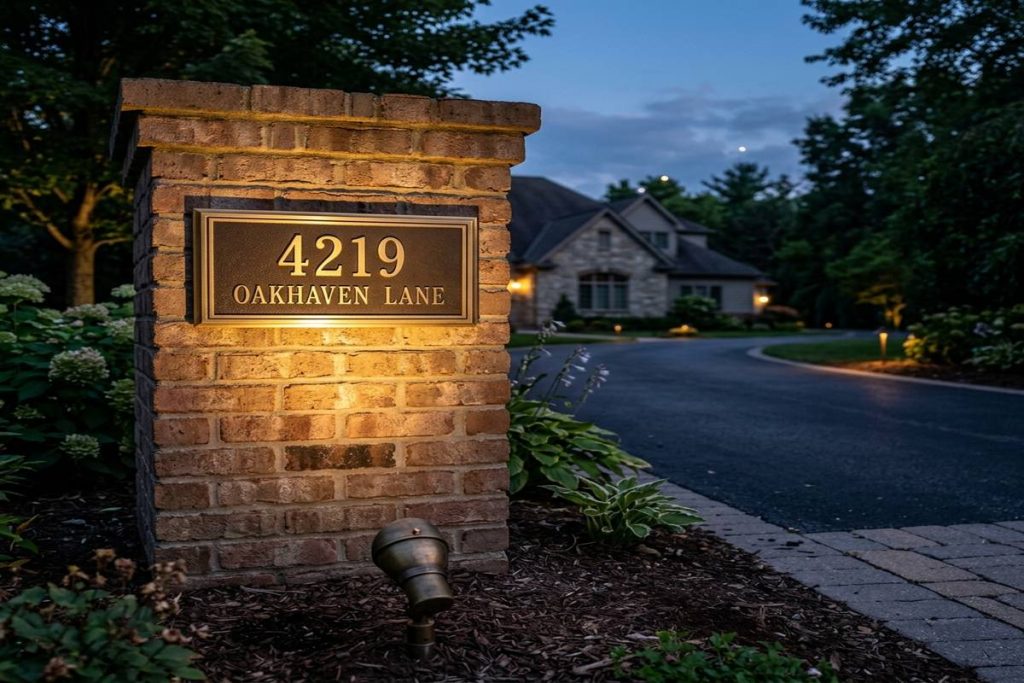
Type 1: Ground-mounted LED uplighters LED spotlights buried in the ground or surface-mounted at the base of the sign project a narrow beam of light upward across the sign face. This is the most common and versatile illumination method for stone and brick estate entrance signs.
When the beam is aimed at a shallow angle to the sign face (30 to 45 degrees), it creates dramatic shadow across any carved letters, raised relief work, or surface texture. The stone seems to glow from within. This is the most photogenic lighting effect for heritage, classic, and traditional entrance signs.
Uplighters are suitable for all stone types: granite, sandstone, limestone, and slate. They work from either solar or mains power.
Type 2: Halo backlighting (reverse channel letters) Dimensional letters are mounted 25 to 40mm proud of the sign panel face. LED strip lighting is installed in the gap between the letter backs and the panel face. This creates a halo of light around each letter without the LED source being directly visible.
The halo effect is very clean and modern. It reads extremely well against dark panel backgrounds (dark granite, Corten steel, slate). It works best for contemporary and modern minimalist estate styles. It does not suit traditional or heritage sign aesthetics.
Halo backlighting uses an LED driver and strip that are completely sealed inside the sign housing, so the light source itself is fully protected from weather.
Type 3: Internal LED lightbox panels A lightbox sign has a translucent face panel (typically 3mm to 5mm LED-diffusing acrylic or polycarbonate) with LED strips or LED arrays illuminating the panel from behind. The entire face glows evenly. Text is typically opaque (blocking the backlight), creating a reverse-read high-contrast effect.
Lightbox signs provide very high visibility from long distances because the full panel face glows. However, they look less premium than uplighting or halo on traditional stone signs. They are best suited for contemporary acrylic or aluminium sign panels in gated community entrances where maximum visibility is the priority.
Type 4: Integrated in-stone or in-panel LED channels LED strip lighting is routed into machined channels cut directly into the stone or panel material. The LED strip sits flush with or just below the surface. The stone face itself glows softly. This is the most discreet and technically demanding illumination method.
Integrated LED channels are the most expensive option but produce a completely seamless effect where no external light source is visible at all. Suitable only for granite, engineered stone, or dense HDU composite panels that can accept precision-machined channels.
| Illumination Type | Best For | Solar Possible | Mains Required | Effect |
| Ground uplighter | Stone/brick monument signs | Yes (up to 20W) | No (optional) | Dramatic shadow play on carved letters |
| Halo backlit letters | Contemporary dark panel signs | Yes (up to 15W) | No (optional) | Clean light aura around each letter |
| Internal lightbox | High-visibility community signs | Yes (up to 30W) | Optional | Full face glow, maximum distance |
| Integrated in-stone LED | Premium granite luxury signs | Rarely practical | Usually yes | Flush seamless glow in stone |
Expert Note: When comparing two LED uplighter models proposed for an estate entrance sign and needing to determine which one delivers a higher total luminous flux (total light output, in lumens) despite having similar wattage ratings, to confirm the more efficient unit before purchase, an integrating sphere photometer with 500mm diameter Spectralon-coated sphere, USB-connected spectral analyser, and CIE 1931 standard observer weighting function for photopic luminous flux calculation is used to measure the absolute luminous flux output (lumens) of each complete LED uplighter assembly at rated voltage and stabilised operating temperature. An uplighter labelled 10W that produces 850 lumens has a luminous efficacy of 85 lumens per watt. A competitor product also labelled 10W but producing only 650 lumens has an efficacy of 65 lumens per watt. The higher-efficacy unit produces 30 percent more light for the same electrical energy, resulting in a significantly brighter sign face at identical power draw. Total luminous flux measurement follows CIE 84:1989 (The Measurement of Luminous Flux), the international standard governing integrating sphere photometric measurement of light sources and luminaires.
How Do You Choose the Right LED Light Source for a Sign?
The LED light source inside the luminaire is the most important component in the whole lighting system. A premium LED maintains its brightness and colour for 50,000 hours or more. A budget LED fades to 70 percent of its original brightness after just 10,000 hours, which means visibly dim lighting within 3 to 4 years of installation.
The L70 metric: what it means and why it matters L70 is the number of hours an LED operates before its light output falls to 70 percent of its original level. This is the industry-standard way of specifying LED lifetime. An LED with L70 of 50,000 hours will still be at 70 percent brightness after 50,000 hours. For a sign that runs 10 hours per night, this is 13.7 years before relamping.
An LED with L70 of only 10,000 hours (common in budget fixtures) will fade to 70 percent brightness in just 2.7 years at the same usage rate. This means noticeably dim sign lighting within 3 years of installation.
COB versus SMD LED technology: COB (Chip on Board) LEDs place multiple LED chips directly on a single board with a single lens. This gives very high brightness per unit area and excellent colour consistency across the beam. COB LEDs are preferred for sign uplighters where concentrated high-intensity illumination is needed.
SMD (Surface Mount Device) LEDs are individual chips mounted separately. They are the standard technology for LED strip lighting used in halo backlighting and integrated channel illumination. High-density SMD strips (240 LEDs per metre) give very even light distribution along the full strip length.
Minimum LED specifications for estate entrance signs:
- CRI (Colour Rendering Index): 80 minimum, 90 recommended. A CRI below 80 makes stone colours look grey and flat.
- L70 lifetime: 50,000 hours minimum for a premium installation.
- Colour consistency: MacAdam ellipse Step 3 or better (this ensures all the LEDs in the fixture have the same colour and there is no visible colour variation).
- Operating temperature range: minus 20 degrees to plus 50 degrees Celsius minimum.
Expert Note: When predicting the useful service life (L70 lumen maintenance lifetime) of a new COB LED uplighter destined for 10 years of continuous outdoor service as an estate entrance sign light, before accepting the product for installation, an LED lumen maintenance measurement rig with bonded K-type thermocouple positioned at the LED package Tc point (case temperature reference point) as defined by IES LM-80-15, temperature-controlled environmental chamber maintaining 55 degrees Celsius and 85 degrees Celsius test conditions simultaneously, and photometer recording initial and periodic luminous flux at 1,000-hour intervals over 6,000 hours of accelerated testing is used to generate the L70 lumen maintenance projection for the COB LED at the rated junction temperature. The 6,000-hour LM-80 data set is then processed through the TM-21 extrapolation algorithm to project L70 lifetime beyond the test period. An L70 projection below 30,000 hours fails the specification and the product is rejected. LED lumen maintenance measurement follows IES LM-80-15 (Approved Method: Measuring Luminous Flux and Color Maintenance of LED Packages, Arrays and Modules), the North American photometric standard for LED lifetime characterisation.
What Is the Correct Colour Temperature for a Driveway Entrance Sign?
Colour temperature is measured in Kelvin (K). It describes how warm or cool the light looks to the human eye. For estate entrance signs, the colour temperature you choose determines the mood and character of the whole entrance.
2700K: warmest white This is the colour of a traditional incandescent bulb or a warm candlelight. At 2700K, the light has a noticeable amber tone. It gives stone and timber an extremely warm, welcoming glow. It is the right choice for heritage, Georgian, Victorian, and rural estate entrances. It suits sandstone and limestone particularly well because the warm tone matches and enhances the natural buff and honey tones in the stone.
The limitation of 2700K is that it can make white or grey stone (marble, grey granite) look slightly yellow. It is also less energy-efficient than higher colour temperatures at the same lumen output because of the phosphor conversion required.
3000K: warm white luxury 3000K is the recommended colour temperature for the majority of residential estate entrance signs. It is warm enough to feel welcoming and premium, but neutral enough to suit both warm and cool stone colours. It is the standard colour temperature for luxury hotel entrances, high-end restaurant exteriors, and premium residential gates globally.
This is the right default choice for anyone who is unsure which colour temperature to select.
4000K: cool white contemporary 4000K gives a clean, crisp, neutral white light. It reads as modern and precise. It is the right choice for contemporary dark granite with stainless steel letters, Corten steel panel signs, and minimalist urban gate designs. At 4000K, the sign looks sharp and contemporary.
Also, 4000K light significantly improves nighttime legibility of white or metallic letters on dark backgrounds compared to 3000K.
5000K and above: not recommended for residential estate signs 5000K and higher gives a bluish-white daylight tone. This is suitable for commercial security lighting and car parks. For a residential estate entrance, it looks harsh, institutional, and cold. It makes warm stone look grey and flat. Do not use 5000K or above for any estate entrance sign lighting.
Expert Note: When designing the nighttime illumination for a rural estate entrance sign at a location where the gate is open to public road viewing and where the approaching visitors’ eyes will be partially dark-adapted (having driven for some time on unlit country roads), to determine which colour temperature provides the best sign legibility under the specific mesopic viewing conditions at the site (mesopic adaptation is the intermediate visual state between full photopic daylight adaptation and fully dark-adapted scotopic vision), a mesopic photometer with V(lambda) photopic and V-prime(lambda) scotopic spectral correction curves, dual-output luminance display in both photopic cd/m2 and scotopic cd/m2, and S/P (scotopic to photopic) ratio calculation from a built-in spectral radiometer is used to measure the adaptation state of a trained observer standing at the 30-metre approach viewpoint and to calculate the optimal S/P ratio for sign legibility under those conditions. For a mesopic adaptation state corresponding to a 0.01 to 1 cd/m2 background luminance (typical for a dark rural road), a 3000K warm source (S/P ratio approximately 1.3) outperforms a 2700K source (S/P ratio approximately 1.0) in mesopic visibility by approximately 20 percent. Mesopic photometric analysis follows CIE 191:2010 (Recommended System for Mesopic Photometry Based on Visual Performance), the international standard for visual performance-based mesopic photometric calculations.
How Do You Size the Lighting System for Your Entrance Sign?
Sizing the lighting system correctly avoids two problems: an undersized system that leaves the sign dimly lit, and an oversized system that wastes energy, creates glare, and looks aggressively bright.
Step 1: Calculate the target illuminance on the sign face. For a residential estate entrance sign, the target illuminance on the sign face is 50 to 200 lux. Below 50 lux, the sign is too dim to read from a moving vehicle at 20 metres. Above 200 lux, the sign becomes a glare source for approaching drivers.
For a premium heritage stone sign, target 75 to 150 lux. For a contemporary backlit sign, the internal illuminance target is different (the internal LED brightness is specified, not the face illuminance).
Step 2: Use the inverse square law to size the uplighter. The inverse square law states that illuminance at a surface equals the luminous intensity of the source (in candela) divided by the distance squared (in metres).
For a 500mm by 400mm sign face at 0.8 metres from a ground uplighter aimed at 30 degrees: Effective distance = 0.8 metres / cosine(30 degrees) = 0.92 metres. For a target of 100 lux: luminous intensity required = 100 x (0.92)2 = 85 candela minimum.
A standard 10-watt LED uplighter with a 15-degree beam angle provides approximately 600 to 800 candela peak intensity. This is more than sufficient for a small to medium estate sign at 0.8 to 1.2 metres uplighter distance.
Step 3: Plan for two uplighters for a sign wider than 1 metre. A single narrow-beam uplighter creates a bright central zone with dimmer edges. For sign panels wider than 1,000mm, use two uplighters positioned at either side of the sign and aimed to overlap in the centre. This creates even coverage across the full sign width.
Step 4: Verify with a lighting simulation before ordering. DIALux Evo is a free lighting simulation software used by professional lighting designers. It allows you to input the luminaire photometric data (available from the manufacturer’s website) and the sign panel dimensions and position to generate a predicted lux map of the sign face. This takes 15 minutes and prevents the expense of replacing an incorrectly sized system after installation.
| Sign Panel Width | Sign Panel Height | Uplighter Quantity | Recommended Wattage Each | Expected Face Illuminance |
| Up to 600mm | Up to 400mm | 1 uplighter | 5 to 10W | 100 to 200 lux |
| 600 to 1,200mm | Up to 600mm | 2 uplighters | 10W each | 100 to 150 lux |
| 1,200 to 2,000mm | Up to 800mm | 2 to 3 uplighters | 10 to 20W each | 75 to 150 lux |
| Over 2,000mm wide | Any height | 3 to 4 uplighters | 20W each | 75 to 125 lux |
Expert Note: When commissioning an illuminated estate entrance sign with two 10W LED uplighters and wanting to verify that the light distribution across the 1,200mm wide carved sandstone sign face is acceptably uniform (maximum to minimum ratio below 4:1 to prevent bright spots and dark corners) before accepting the installation, a two-dimensional imaging luminance measurement device (ILMD) with 2,048 x 2,048 pixel calibrated CCD sensor, 0.001 cd/m2 minimum measurable luminance, automatic vignetting correction, and ANSI/IES TM-30 falsecolor luminance mapping output is used to capture a full-resolution luminance map of the sign face from the 10-metre approach viewpoint. The falsecolor image shows immediately whether the illumination is uniform or whether one uplighter is overperforming relative to the other. A uniformity ratio above 5:1 (from the map) indicates that the uplighter aiming angle needs adjustment. Imaging luminance measurement of illuminated signs follows the instrument performance specification in DIN 5032-7:1985 (Measurement of Light: Photometers: Requirements for Instruments for Measuring Luminous Intensity Distribution), adapted here for 2D imaging photometer characterisation.
What Lighting Positions Give the Best Results for Sign Illumination?
The position of the light source relative to the sign face determines how dramatic, even, and glare-free the result is.
Ground uplighter position: the three rules
Rule 1: The uplighter should be positioned between 300mm and 600mm in front of the sign face (measured horizontally at ground level). Closer than 300mm creates an extreme grazing angle that casts very deep shadows and can make the sign text hard to read. Further than 600mm produces a shallow angle that gives less shadow depth and less three-dimensional effect.
Rule 2: The uplighter beam should be aimed at the centre of the sign face, not at the top or bottom. For a sign panel 500mm tall, the uplighter should be aimed at a point 250mm above ground level on the sign face (the midpoint of the panel).
Rule 3: For signs on a pillar or post, position the uplighter directly in front of the sign face, not to the side. A side-positioned uplighter creates uneven illumination: bright on the near side, dark on the far side. This makes the sign look poorly lit even if the total light output is adequate.
Avoiding glare Glare from a sign light affects approaching drivers and can be a safety hazard. Also, it is a common cause of neighbour complaints. Avoid glare by: using a luminaire with a narrow beam angle (10 to 20 degrees) rather than a floodlight; ensuring the luminaire housing shields the LED source from direct view from the road; and using a white or pale housing colour that reads as background rather than as a light source.
Height considerations for halo backlighting For halo-backlit signs, the LED driver is typically mounted inside the sign housing behind the panel. The LED strip position relative to the letter or panel edge determines the width of the halo. A gap of 25mm from the strip to the panel edge gives a tight 15mm visible halo at the face. A gap of 50mm gives a wider 25mm halo. Choose based on the sign scale: smaller signs need a tighter halo or it looks out of proportion.
Expert Note: When evaluating whether a proposed LED uplighter intended for outdoor estate sign illumination produces acceptable levels of light flicker that will not cause visual discomfort, headache, or stroboscopic effects for visitors approaching the entrance, a photometric flicker meter with 100kHz detector bandwidth, Pst (short-term flicker severity) calculation per IEC/TR 61547-1, SVM (stroboscopic effect visibility measure) calculation per CIE TN 006:2016, and IEEE 1789 modulation depth display is used to measure the temporal light modulation (TLM) characteristics of the LED uplighter operating from the proposed 24V DC LED driver. A Pst value above 1.0 indicates perceptible flicker under normal observation conditions. An SVM value above 1.6 indicates stroboscopic effects visible under moving conditions. The LED driver must be replaced with a flicker-free model (typically a constant-current driver with active power factor correction) if either limit is exceeded. LED flicker measurement follows IEEE 1789-2015 (IEEE Recommended Practices for Modulating Current in High-Brightness LEDs for Mitigating Health Risks to Viewers), the primary LED flicker safety standard.
How Do You Make a Solar-Powered Illuminated Sign Work Reliably All Year?
Solar-powered sign lighting is an excellent choice for gate signs that are far from the mains electrical supply. Modern solar LED systems can deliver reliable year-round illumination with zero running costs and no cable trenching.
However, an undersized solar system will fail in winter. The three most common solar sign lighting failures are: solar panel too small for the winter sun available, battery too small for multi-day cloudy periods, and LED driver too inefficient for the battery capacity.
Step 1: Know your peak sun hours. Peak sun hours (PSH) is the average daily solar energy available at your location, measured in hours of full-intensity sunshine equivalent. In the UK, PSH in winter is approximately 1.0 to 1.5 hours per day. In southern India, PSH in winter is 4.5 to 5.5 hours per day. In northern Australia, PSH in winter is 5.0 to 6.0 hours per day.
This number determines how much solar panel capacity you need to recharge the battery each day.
Step 2: Calculate the daily energy demand. If the sign light runs at 10 watts for 10 hours per night, the daily energy demand is 100 watt-hours (Wh). The solar panel must produce at least 100Wh on the shortest winter day.
At 1.5 PSH (UK winter), the solar panel must generate at least 100Wh in 1.5 hours: panel rated wattage = 100 / 1.5 = 67 watts minimum. This accounts for no system losses. With typical 80 percent system efficiency, the panel should be rated at 84 watts or more.
Step 3: Size the battery for 3 days of backup. The battery should store enough energy for 3 consecutive nights without any solar charging (to cover cloudy periods). For a 10W light running 10 hours per night: battery capacity = 10W x 10 hours x 3 nights = 300Wh. For a 12V lithium battery, this is 300Wh / 12V = 25 amp-hours minimum. For a 24V system, 12.5Ah minimum.
Always use a lithium (LiFePO4) battery rather than a lead-acid battery for solar sign lighting. Lithium batteries are rated for 2,000 or more charge cycles versus 300 to 500 for lead-acid, and they maintain near-constant output voltage until nearly depleted, meaning the light stays bright until it switches off rather than gradually dimming as the battery discharges.
Step 4: Position the solar panel optimally. In the northern hemisphere, face the panel south and tilt it at an angle equal to your latitude. In the southern hemisphere, face it north at latitude angle. Shade from trees, pillars, or the gate itself at any time of day drastically reduces solar panel output. Even 10 percent shade on 10 percent of the panel can reduce total output by up to 50 percent due to cell blocking effects.
Expert Note: When commissioning a solar-powered estate entrance sign lighting system and needing to verify the health of the 25Ah LiFePO4 lithium battery before final handover, to confirm that the battery will deliver its full rated capacity (not just a fraction of it due to cell degradation during storage or transport), a battery impedance spectroscopy tester with frequency sweep from 1mHz to 100kHz, equivalent circuit model fitting software, and cell-by-cell internal resistance mapping for 4-cell 12.8V LiFePO4 packs is used to measure the internal resistance and state-of-health (SOH) of the installed lithium battery pack without fully discharging and recharging it. A healthy new LiFePO4 cell has an internal resistance below 5 milliohms per cell at 1kHz. A cell showing above 10 milliohms internal resistance indicates early aging or a manufacturing defect, and the battery should be replaced before installation. Lithium battery safety and impedance testing follows IEC 62133-2:2021 (Secondary Cells and Batteries Containing Alkaline or Other Non-Acid Electrolytes: Safety Requirements for Portable Sealed Secondary Lithium Cells and Batteries for Use in Portable Applications), the international standard governing lithium battery characterisation and acceptance testing.
How Do You Wire an Illuminated Entrance Sign to the Mains Safely?
Mains-powered illuminated signs require a properly designed, installed, and tested electrical circuit. All mains electrical work on a permanent outdoor sign circuit must be carried out by a qualified electrician and notified to the local building control authority where required by local regulations.
Cable specification for outdoor buried sign circuits: Use 2.5mm2 (three-core plus earth) steel wire armoured (SWA) cable from the main electrical supply to the sign. SWA cable provides mechanical protection against accidental damage from digging, lawnmowers, and garden tools. Lay the cable at a minimum depth of 500mm in the UK (600mm in most other countries). Place cable marker tape directly above the cable in the backfill to warn future excavators.
Circuit protection requirements: The sign lighting circuit must be protected by:
- A 30mA RCD (residual current device) for protection against electric shock from cable damage or water ingress into the luminaire housing.
- An MCB (miniature circuit breaker) correctly rated for the cable size and lighting load (typically 6A MCB for a 100W sign lighting circuit on 2.5mm2 cable).
- A weatherproof isolator switch near the sign (within reach for maintenance) so the circuit can be isolated safely for cleaning or lamp replacement.
LED driver installation: The LED driver (power supply) converts the 230V mains to the low-voltage DC required by the LED fixtures (typically 24V DC or 12V DC). Mount the LED driver in a weatherproof enclosure (IP65 or higher) near the sign but protected from direct rain exposure. LED drivers have a limited operating temperature range (typically 0 to 40 degrees Celsius). In a location that gets very hot in summer, mount the driver in a shaded position or use a passively ventilated enclosure to prevent thermal shutdown.
Cable joints and connections: Never use domestic connector blocks in an outdoor installation. All cable joints must be in IP68-rated enclosures or use specifically rated outdoor gel-filled cable joint kits. Any water-ingress into a cable joint causes early insulation failure, which can lead to earth faults and RCD tripping.
Expert Note: When completing the installation of a 240V mains-powered illuminated estate entrance sign and carrying out the mandatory electrical installation verification tests before energising the circuit for the first time, a cable insulation resistance tester (megohmmeter) with 500V DC test voltage for 250V AC rated cables, digital display with 0.01 MOhm resolution from 0 to 2,000 MOhm, PI (polarisation index) test mode over 10 minutes, and automatic discharge at test completion is used to measure the insulation resistance of each conductor pair in the buried SWA cable run between the main consumer unit and the sign uplighter connection point. A minimum acceptable insulation resistance of 1 MOhm is required between any conductor and earth for a circuit rated above 50V AC. A reading below 1 MOhm on a newly installed cable indicates cable damage during installation (staple penetration, mechanical crushing) that must be located and repaired before energisation. Insulation resistance testing of completed low-voltage electrical installations follows IEC 60364-6:2016 (Low-Voltage Electrical Installations: Verification), the international standard governing initial and periodic verification of completed electrical installations.
What IP Rating Does an Outdoor Sign Light Need?
The IP rating (Ingress Protection rating) tells you how well a luminaire is protected against dust and water. It is a two-digit code defined by IEC 60529. The first digit covers dust protection (0 to 6). The second digit covers water protection (0 to 8).
For outdoor sign lighting, the first digit should always be 6 (fully dust-tight). The second digit depends on the specific exposure of the installation.
IP65: standard outdoor sign lighting requirement IP65 means the luminaire is dust-tight and protected against low-pressure water jets from any direction (equivalent to moderate rain and irrigation spray). This is the minimum acceptable rating for any outdoor sign lighting in a sheltered position.
IP66: heavy rain and wind-driven rain IP66 is dust-tight and protected against powerful water jets. This is the correct rating for sign lighting in coastal, hillside, or otherwise exposed positions where rain is frequently wind-driven at high angles to the luminaire face.
IP67: temporary submersion IP67 means dust-tight and protected against temporary submersion in water to 1 metre for 30 minutes. This rating is required for ground-mounted uplighters in areas that experience surface water flooding, heavy irrigation, or where the luminaire sits in a recessed housing that can accumulate water.
IP68: continuous submersion IP68 is required only for permanently submerged luminaires (underwater lighting). It is not required for standard estate sign lighting.
Common mistake: Assuming that because a luminaire is IP65 rated, the cable connection inside the luminaire is also IP65 rated. It is not. The IP rating applies only to the sealed housing. The cable entry gland must be specified and installed separately to the same IP rating. Always use the correct IP-rated cable gland matched to the cable outer diameter.
Expert Note: When accepting delivery of a batch of 10 new IP67-rated LED ground uplighters for a large estate entrance signage installation and carrying out incoming quality inspection before installation to confirm each luminaire actually meets its stated IP67 rating and has not been damaged in transit, an IP spray test chamber with IPX5 water jet nozzle (6.3mm internal diameter at 12.5 litres per minute, 2.5 to 3 bar pressure) and IPX6 high-pressure nozzle (12.5mm internal diameter at 100 litres per minute) mounted on a calibrated motorised turntable is used to subject 3 randomly selected uplighter samples from the delivery batch to the IPX5 and IPX6 test sequences, each for 3 minutes per orientation, before opening the housing and inspecting for water ingress with a visual examination and cotton tissue test. Any water in the housing fails the IP test. Failed samples are rejected and the full batch is returned to the supplier. IP code ingress protection testing follows IEC 60529:2013 (Degrees of Protection Provided by Enclosures: IP Code), the international standard for all IP rating test procedures and acceptance criteria.
How Do You Reduce Light Pollution and Avoid Trespass onto Neighbouring Properties?
Light trespass is when your sign lighting spills onto a neighbouring property, into the road in a way that dazzles drivers, or upward into the sky. It is the most common complaint associated with estate entrance sign lighting. In many countries, excessive light trespass is a statutory nuisance under local environmental law.
The BUG rating system: BUG stands for Backlight, Uplight, and Glare. It is the standard way of classifying how well a luminaire controls its light distribution. A luminaire with a BUG rating of B0, U0, G0 means it produces no backlight, no uplight, and no glare outside the intended illumination zone. For estate sign lighting in sensitive rural locations or Conservation Areas, specify luminaires with a U0 rating (zero uplight).
Practical steps to reduce light trespass:
Use full-cutoff luminaires. A full-cutoff luminaire directs all light below the horizontal plane. No light from a full-cutoff luminaire shines directly into the sky. This is the single most effective step for dark sky compliance.
Use narrow beam angles. A 15-degree beam angle (typical for a good quality narrow-beam sign uplighter) keeps all the light on the sign face with very little spill beyond the sign edges.
Use shields and hoods. If a luminaire has a wider beam than ideal, a barn-door-style shield can be fitted to the luminaire to cut off the beam edges precisely. Most quality landscape lighting manufacturers offer these as accessories.
Use a timer or dusk-to-dawn controller. Switching the sign light off between midnight and 6am reduces the total hours of potential light trespass to nearby residents overnight.
Also, lower the lighting power in the late evening. A smart LED driver with dimming control can reduce the sign light from 100 percent output (in the 9pm to 11pm window when visitors may still arrive) to 30 percent output (for the rest of the night), dramatically reducing any perceived trespass.
Expert Note: When measuring the blue light hazard irradiance from a proposed LED uplighter to confirm it is safe for occasional glance exposure by estate residents who may look briefly toward the illuminated sign face when approaching the gate by foot, a photobiological safety radiometer with four interchangeable detector heads (EUV: 200-400nm; EBlue: 300-700nm weighted by blue light hazard function B-lambda; ENIR: 760-1400nm; and Eretinal thermal: 380-1400nm) with 5 nm resolution and IEC 62471 Group classification output is used to measure the radiance and irradiance of the proposed LED uplighter at 200mm and at 500mm from the luminaire aperture in a darkened laboratory. For a Luminance class Exempt classification (the lowest risk), the blue light hazard effective radiance must be below 100 W/(m2.sr) at 200mm. Most 3000K warm white LEDs with good diffusion optics fall into Luminance Exempt or Risk Group 1 (Low Risk). A Risk Group 2 or 3 result requires either a lower CCT LED, a diffusion lens, or a repositioning of the luminaire. Photobiological safety measurement follows IEC 62471:2006 (Photobiological Safety of Lamps and Lamp Systems), the international standard for optical radiation safety classification of all light sources.
How Do You Control an Illuminated Entrance Sign Automatically?
Manual switching of a sign light is inconvenient and results in the light being forgotten overnight. Automatic controls ensure the light comes on every evening, goes off when appropriate, and operates at the right brightness for the conditions.
Dusk-to-dawn photoelectric sensor (photocell) A photoelectric sensor switches the light on when ambient light falls below a set threshold (typically 10 lux) and off when it rises above it. This ensures the sign is lit at exactly the right times without any manual intervention. The photoelectric sensor must be positioned away from the sign light itself (to prevent the sign light from triggering the sensor and causing rapid on-off cycling, known as hunting).
Astronomical timer An astronomical timer is pre-programmed with the GPS coordinates of the installation location. It uses this data to calculate the precise sunrise and sunset time for every day of the year. It switches the light on at sunset and off at sunrise (or at a set number of hours after sunset). An astronomical timer never needs resetting for daylight saving time adjustments. It is the most reliable and lowest-maintenance automatic control option.
Motion detector plus timer (hybrid control) A PIR motion detector activates the sign at full brightness when a vehicle or person approaches (typically 100 percent output for 10 minutes). During the rest of the night, the sign runs at 30 percent output on timer. This combination gives: high-visibility illumination when visitors arrive, low-visibility ambient illumination during quiet periods, and significant energy saving on solar systems.
Smart home integration For properties with a smart home system, the sign lighting can be integrated as a controlled device via Zigbee, Z-Wave, or Wi-Fi protocols. This allows: remote dimming from a smartphone, integration with the gate intercom (light brightens automatically when the gate bell rings), and voice control via smart assistant. Smart dimming drivers from Casambi, DALI, or 0-10V dimming protocol are compatible with most professional LED drivers.
Expert Note: When commissioning the 30mA RCD (residual current circuit breaker) protecting the illuminated estate entrance sign lighting circuit and verifying it will trip within the IEC 61008-1 maximum response time before any test load is connected to the sign, a portable RCD test kit with selectable test current at 50%, 100%, and 500% of rated residual current (15mA, 30mA, and 150mA for a 30mA RCD), automatic trip time measurement to 1ms resolution, and pass/fail display with reference to BS 7671 (IET Wiring Regulations) acceptable trip times is used to test the RCD at three points on the circuit (at the RCD itself, at the sign cable end, and at the luminaire connection point). A 30mA RCD must trip within 300ms at rated residual current (30mA test). At 150mA (5x rated), it must trip within 40ms. A trip time exceeding these limits indicates a faulty or degraded RCD that must be replaced before energising the sign circuit. RCD trip time verification follows IEC 61008-1:2010 (Residual Current Operated Circuit-Breakers without Integral Overcurrent Protection for Household and Similar Uses: General Rules), the international standard for RCD performance characterisation and testing.
What Are the Most Common Illuminated Sign Lighting Mistakes and How to Avoid Them?
Mistake 1: Using a floodlight instead of a narrow-beam uplighter A floodlight (60 to 120 degree beam angle) illuminates the whole gate area but gives no control over where the light falls. It creates glare, lights up the garden, and spills onto the road. Fix: use a narrow-beam uplighter (10 to 20 degrees) that puts all the light precisely on the sign face.
Mistake 2: Wrong colour temperature (5000K or above) Cool blue-white light makes warm stone look clinical and grey. It is visually unattractive on a residential entrance. Fix: use 3000K for most residential entrance signs. 2700K for very warm traditional stone. 4000K only for contemporary dark granite or metal signs.
Mistake 3: Positioning the uplighter too far from the sign An uplighter more than 800mm from the sign face produces a very shallow angle of illumination with minimal shadow depth. The sign looks flat and washed out. Fix: position the uplighter between 300 and 600mm from the sign face.
Mistake 4: Undersized solar system An undersized battery runs flat during the third or fourth overcast day of winter and leaves the sign unlit. Fix: size the battery for 3 full nights of operation at 100 percent output without any solar charging. Use a lithium battery, not lead-acid.
Mistake 5: No earth leakage protection on the mains circuit An unsecured mains sign circuit without a 30mA RCD is a safety hazard. Any water ingress into a cable joint or luminaire can cause a potentially fatal electric shock to anyone touching the sign structure. Fix: always install a dedicated 30mA RCD for any outdoor sign lighting circuit.
Mistake 6: Cheap LED driver with high flicker Budget LED drivers often produce visible light flicker. This is particularly unpleasant when the sign is viewed from a moving car (where the strobe effect is most visible). Fix: specify an LED driver with active power factor correction and less than 10 percent flicker modulation depth.
Mistake 7: No maintenance access to the LED driver LED drivers mounted permanently in a sealed enclosure inside the sign structure that cannot be opened without dismounting the sign make driver replacement (which is eventually needed after 10 to 15 years) very expensive. Fix: always design maintenance access to the LED driver into the sign installation at the specification stage.
Expert Note: When verifying the power factor and electrical efficiency of the proposed LED driver before specifying it for a 20-fixture illuminated estate entrance sign installation (total connected load 200W), to confirm the driver is not causing excessive reactive power draw on the mains supply that could create harmonic interference with the property’s smart home system, a power quality analyser with 50Hz fundamental, harmonic analysis to the 50th order, displacement power factor (cos-phi) and true power factor (PF) simultaneous display, total harmonic distortion of current (THDi) measurement to 0.1% resolution, and data logging at 1-second intervals is used to measure the complete power quality profile of the LED driver under full-load conditions connected to a resistive load bank. A power factor below 0.9 indicates significant reactive power draw that will cause harmonic current injection into the mains supply. An LED driver with THDi above 20 percent fails EN 61000-3-2 Class C (lighting equipment) harmonic limits and may cause interference. The driver is rejected if power factor is below 0.9 or THDi exceeds 20 percent. LED driver power quality measurement follows IEC 61347-2-13:2006+A1:2013 (Lamp Control Gear: Particular Requirements for DC or AC Supplied Electronic Control Gear for LED Modules), the international standard for LED driver electromagnetic compatibility and power quality performance.
How Do You Maintain an Illuminated Entrance Sign to Keep the Light Output High?
A well-maintained LED sign lighting system should remain at or above 90 percent of its original light output for the first 10 years of operation. The main factors that reduce light output over time are: lens fouling (dirt on the optic), LED lumen depreciation (gradual fading), and driver degradation.
Quarterly maintenance: clean the optics Clean the LED lens or cover glass with a soft microfibre cloth and glass cleaner quarterly. Accumulated road dust, pollen, cobwebs, and insect deposits on the lens can reduce light transmission by 15 to 25 percent within a single year. This is particularly significant for buried ground uplighters in dusty locations.
Annual maintenance: check the driver Check the LED driver output voltage and current once a year using a multimeter. The driver output should match the rated specification within 5 percent. Also, check for any discolouration or bulging of the driver housing (signs of internal overheating). If the driver shows any signs of degradation, replace it proactively. A failed driver is the most common cause of complete sign lighting failure.
Annual maintenance: check all cable connections Inspect all outdoor cable connections and junction boxes. Look for: signs of water ingress (white calcium deposits or rust staining inside junction boxes), any cable insulation damage, and cable joint corrosion. Replace any corroded or water-ingressed connections immediately.
5-year maintenance: reseal the luminaire housings LED luminaire housings that are sealed with rubber gaskets gradually lose their IP rating as the gasket material ages and hardens. After 5 years, check all gaskets. If they have hardened or cracked, replace them or reseal the housing with silicone sealant. This restores the IP rating and prevents water ingress that can cause LED package failure.
10 to 15 years: plan for LED driver replacement LED drivers (switching power supplies) typically have a rated lifetime of 50,000 to 70,000 hours, which is similar to the LED lifetime. At 10 hours per night, this is 13 to 19 years of operation. Plan a proactive driver replacement programme at the 15-year mark, even if the driver has not yet failed, to prevent unplanned sign outages.
Expert Note: When performing the 5-year maintenance inspection on the illuminated estate entrance sign lighting system and needing to verify that the luminance of the sign face (as seen from the 30-metre approach viewpoint) has not degraded below 80 percent of the as-installed measurement due to LED lumen depreciation, lens fouling, or driver output reduction, a handheld luminance meter with 1-degree measurement angle acceptance cone, 0.001 cd/m2 lower measurement limit, 6-decade measurement range, and cosine-corrected photo detector with V-lambda spectral correction filter is used to measure the sign face luminance (in candelas per square metre) at the centre, left, and right third-points of the sign face from the standard 10-metre approach position. The readings are compared to the as-installed baseline measurements recorded in the commissioning report. A drop greater than 20 percent from baseline at any measurement point triggers investigation: lens fouling is ruled out by cleaning and re-measuring; if the reading is still low after cleaning, the LED driver output is checked, and the LED package is assessed for lumen depreciation. Luminance meter instrument characterisation and calibration follows CIE 69:1987 (Methods of Characterizing Illuminance Meters and Luminance Meters: Performance, Characteristics and Specifications), the international standard for luminance meter instrument classification.
🛍️ Shop Sign Lighting: Browse our 3000K Narrow-Beam LED Uplighters, Solar Sign Lighting Kits, IP67 Ground Uplighter Sets, and our full Illuminated Sign Design and Installation Service. All systems include a 5-year performance guarantee and full photometric specification on delivery.
Frequently Asked Questions About Illuminated Estate Entrance Signs
What wattage LED uplighter do I need for a stone gate sign?
For most residential estate gate signs (up to 1,200mm wide, at a 0.8-metre uplighter distance), a 10-watt LED uplighter is sufficient to achieve 75 to 150 lux on the sign face. For very large signs (over 1,800mm wide) or for signs that are further from the road (requiring more visual impact from greater distance), use two 15 to 20-watt uplighters. Always use a narrow beam angle (10 to 20 degrees) to keep all the light on the sign face.
What is the best colour temperature for a residential estate sign light?
3000K warm white is the best all-round choice for most residential estate entrance signs. It gives a warm, premium feel that suits stone, timber, and heritage materials. For a very warm traditional stone (honey sandstone, buff limestone), consider 2700K. For a contemporary dark granite or Corten steel sign, 4000K neutral white looks cleaner and more modern.
Can I use a smart bulb or standard garden floodlight for my gate sign?
Standard garden floodlights and smart bulbs are not recommended for professional estate sign lighting. Their wide beam angles (60 to 120 degrees) create glare and light trespass without focusing the light on the sign. Also, most garden lights are not rated for IP67 burial in ground uplight positions. Use a luminaire specifically designed for sign uplighting with the correct beam angle and IP rating.
How long will a solar sign lighting system work in the UK winter?
A correctly sized solar sign lighting system works reliably year-round in the UK, including winter. The key is correct sizing: a 20 to 30-watt monocrystalline solar panel, a 25 to 40Ah lithium battery, and a maximum 10-watt LED load for a dusk-to-11pm operation (typically 4 to 6 hours in UK winter) is a reliable combination. Systems that fail in winter are almost always undersized, use lead-acid batteries that lose capacity in cold temperatures, or have a poorly positioned solar panel that receives only partial sun due to shade or incorrect orientation.
Do I need planning permission for an illuminated gate sign in the UK?
Non-illuminated signs at residential property boundaries are usually permitted development if under 0.3 square metres. Once illuminated, the planning status changes in most UK local authority areas. Illuminated signs at residential boundaries require Advertisement Consent in most cases, especially in Conservation Areas, Areas of Outstanding Natural Beauty, or within listed building curtilages. Always check with your local planning authority before installing any illuminated sign.
What is the difference between halo lighting and flood lighting for a sign?
Flood lighting illuminates the sign face from the front with a broad beam of light. Halo lighting is concealed behind dimensional letters or a sign panel, projecting a rim of light around each letter. Flood lighting (when done properly with a narrow-beam uplighter) is better for carved stone signs where you want to emphasise the texture and depth of the carving. Halo lighting is better for contemporary dimensional metal or acrylic letters where you want a clean, glowing silhouette effect. Both can look excellent when correctly designed for the specific sign type.
How do I stop my LED sign light from making a buzzing sound?
LED buzzing is almost always caused by a low-quality or incorrectly rated LED driver. A poor driver produces high-frequency current ripple that causes mechanical vibration in the LED package or the driver’s transformer. Fix: replace the driver with a high-quality constant-current LED driver with active power factor correction and less than 10 percent output ripple. Also, ensure the driver is correctly rated for the connected LED wattage: running a 20W driver at only 3W (heavily underloaded) also causes buzzing in many driver designs.
Can I dim my estate entrance sign lights?
Yes. Most quality LED sign lighting systems can be dimmed using a 0-10V, DALI, or PWM dimming signal input to the LED driver. Dimming to 30 percent output during late-night hours (midnight to 6am) saves significant energy on a mains system, reduces any light trespass to neighbours, and extends LED and driver lifetime. For solar systems, dimming during low-demand periods extends battery life and improves winter reliability. Specify a dimmable LED driver when ordering the system, as most standard non-dimmable drivers cannot be retrofitted with dimming capability later.
What maintenance does a solar sign light battery need?
Lithium iron phosphate (LiFePO4) batteries used in quality solar sign lighting systems are almost maintenance-free. They do not need topping up, equalisation charges, or ventilation. The primary maintenance task is a capacity check every 3 years: fully charge the battery and then discharge it through the sign light at 100 percent output and measure how many hours of runtime it delivers before the battery management system cuts off. A healthy battery should deliver at least 80 percent of its rated amp-hour capacity. A battery delivering less than 60 percent of rated capacity should be replaced.
Is there a risk of electric shock from a buried LED uplighter?
A correctly specified and installed ground uplighter connected to a 24V DC LED driver presents no electric shock risk. The 24V DC output of the LED driver is “safety extra-low voltage” (SELV) and cannot cause a dangerous electric shock under any circumstances. The 240V mains AC supply to the driver is the section that carries shock risk, and this must be installed by a qualified electrician with correct RCD protection, armoured cable, and proper circuit protection as described in the wiring section of this guide.
Explore Essential House Name Plate Guides & Tutorials
Browse our comprehensive handcrafted signage guides for material care, font selection, and architectural placement:
- Beach & Airbnb Signage Design & Weatherproofing Guide (2026)
- Complete Guide to Wood House Sign Sealing & Weather Maintenance
- Horizontal vs Vertical House Numbers Layout Comparison
- Hanging & Wall-Mounted Cottage Sign Installation Guide
- Round vs Rectangular Name Plaques for Modern Property Entrances
- Best Modern & Vintage Fonts for Cottage & Residential Signs